The following points highlight the six main steps to prepare permanent slides for animals. The steps are: 1. Killing 2. Fixing and hardening 3. Staining 4. Dehydration 5. Clearing 6. Mounting.
Step # 1. Killing:
It is the first step in the preparation of permanent mounts and is of prime importance. By Killing we mean the instantaneous stoppage of all vital activities in their respective original state without giving the tissue enough opportunity to undergo any postmortem changes. This can only be achieved by the use of reagents which are quick acting and which do not allow any change in the outer and internal form of the tissue.
The best killing agents are:
1. 0.1% osmic acid and
ADVERTISEMENTS:
2. Ether
Another good reagent which is most commonly used is absolute alcohol. But this reagent has one major drawback that it shrinks and contorts the tissues.
Process of Killing:
(1) The material to be killed is put on a slide on which a very thin film of Mayer’s albumen has been spread uniformly (by rubbing a drop of albumen on surface of slide vigorously with index finger).
ADVERTISEMENTS:
(2) (a) the slide is either inverted for a few second on the mouth of the bottle in which osmic acid crystals have been put in distilled water.
or
(b) A few drops of ether or absolute alcohol are placed over the object (material) on the slide and allowed to evaporate.
Step # 2. Fixing and Hardening:
Fixing and hardening is the second major step in slide preparation. In case of minute living organisms fixing and hardening are usually attained by the killing agents alone but in case of sections of larger organisms or tissues this is done through use of various fixing agents.
ADVERTISEMENTS:
The process of fixing has varied purposes, such as:
(1) Fixing stops any alteration in the form of tissues.
(2) It hardens the tissues and makes them fit for extensive subsequent processing.
(3) It makes the tissues suitable and susceptive for the action of stains and various other reagents.
(4) Fixing agents make various constituents and components of a tissue optically differentiated by changing their refractive indices.
The various important fixing agents are:
(1) Bouin’s fluid,
(2) Mercuric chloride,
(3) 70% Alcohol,
ADVERTISEMENTS:
(4) Acetic acid,
(5) Formaline (formaldehyde)
(6) Potassium dichromate and
(7) Osmic acid (osmium tetraoxide).
After fixing in any of the aforesaid fixatives thorough washing of material is very essential otherwise the tissues may be completely spoiled. Various reagents used for washing are:
(1) 70% Alcohol (for Bouin’s)
(2) Iodine + 70% alcohol, for mercuric chloride
(3) 50% alcohol for acetic acid
(4) 70% alcohol for formaldehyde
(5) Water and 0.12% chloral hydrate for potassium dichromate and
(6) Water (for osmic acid and K2CrO7).
Step # 3. Staining:
The process of colouring of various components and parts of a tissue for the purpose of clear and absolute differentiation through use of different dyes (stains) is called staining. The nature of dyes may be acidic, basic or neutral. Usually the acidic dyes stain the cytoplasmic part and basic dyes colour the nuclear part.
However, with a basic or nuclear dye cytoplasm may also be stained. For the purpose of undergraduate studies usually general staining (single staining) is used, which may colour both nucleus and cytoplasm at the same time. But, where specific stains are used, they are usually used in combination of two (double staining), three (triple staining), four or even more stains.
Single Staining:
For the purpose of single staining the dyes used are picro-indigo-carmine or borax carmine in 70% alcohol or pircrocarmine in water.
Procedure:
The material, after thorough washing is passed through gradually increasing percentage of the medium in which stain is made, e.g., since borax carmine or picro-indigo-carmines are usually made in 70% alcohol, the material should first be passed through 30% alcohol, 50% alcohol and 70% alcohol for at least 3 minutes in each.
After the material has been saturated with the medium, it is put in the stain for about 3 minutes or till the material becomes dark red (in Borax carmine) or dark green (in Picroindigocarmine) 1.
After staining, the material is washed with the medium or solvent (70% alcohol in case of borax carmine and picroindigocarmine). If the stain is darker, it may easily be removed from the tissue through use of acid alcohol in which the material is put for a few minutes (1-2 minutes) and after every 30 second it is dipped into 70% alcohol and examined under microscope till desired colour is achieved.
Specific Staining:
For the purpose of double staining usually Delafield’s Haematoxylin in distilled water and Eosin in 70% alcohol are used.
Procedure:
The material, after thorough washing, is put in Haematoxylin for 5 minutes or till it is blackish blue. The material, after staining in haematoxylin, is passed through the medium or solvent in which second stain is prepared, Since Eosin is prepared in 70% alcohol the material is passed through 30% ale.
50% ale and 70% alcohol and is kept in Eosin for one minute. After staining it is just washed through a dip in 90% alcohol (never use 70% alcohol).
Step # 4. Dehydration:
It is the process by which the traces of water present in the tissue are removed and replaced by alcohol. Alcohol is used because the clearing agent and solvent of mounting medium are readily soluble in alcohol, but mounting medium and its solvent (usually xylene) and the clearing agent (usually Xylene or Benzene) are un-miscible in water.
Dehydration is achieved by passing the tissue through gradually increasing percentage of alcohol. However, if we directly put the material in absolute alcohol it will shrink because of sudden loss of water.
The material is thus passed through 30%, 50%, 70%, 90% and 100% (absolute) alcohol. To achieve proper dehydration the material, after absolute alcohol, should again be dipped in fresh absolute alcohol up to 3 to 4 times for one minute each time.
Alcohol may better be substituted by cello solve (Ethylene glycol mono ethyl ether) because cello solve freely mixes with alcohol, water, xylol and clove oil etc., and it doesn’t shrink the tissue. Also, it avoids repeated placement in alcohol in gradually increasing strength.
1. It is always advisable to use regressive staining method, i.e., the tissue should be first over-stained and then destained till desired depth of colour is achieved.
2. After single and double staining the excessive stain is removed by washing the tissue in acid alcohol (for stain prepared in alcohol) or acid water (for water prepared stains) for very short period repeatedly till the desired differentiation is achieved.
3. It is always advisable to use either staining tube or cavity blocks (covered) to avoid entry of atmospheric moisture and excessive evaporation of alcohol and reagent and as a safeguard against the loss of material.
Step # 5. Clearing (Dealcoholization):
The substitution of dehydrating agent (alcohol or cellosolv), by the solvent of mounting medium is called clearing. The term clearing is also used because the solvent or clearing agent imparts transparency to the tissue.
The best clearing agents are Cedar wood oil and Clove oil but the most commonly used reagent is Xylene. In its place Benzene may also be used. Since, Xylene makes the tissue hard and brittle and also causes its shrinkage, as such, it may be avoided and in its place, if possible, cedar wood oil or clove oil may be used.
Procedure:
The material, after absolute alcohol, is placed in xylene or any other clearing agent. If the clearing agent turns turbid or white, it shows that dehydration is not complete. Hence put the material again in fresh absolute alcohol for 5 minutes and then dip in clearing agent for 5 minutes or till it becomes transparent. Still, if turbidity appears put the material for 5 minutes in fresh clearing agent.
Step # 6. Mounting:
The material, after it has been made transparent, is transferred to a drop of mounting medium which is placed in the centre of the slide and is covered by a cover slip. The mounting medium should be of the same refractive index as the cover slip (R.I. 1.5).
The best mounting media are:
(1) Canada balsam dissolved in xylene (1.4 refractive index) or
(2) Euparol (1.4 refractive index)
Procedure:
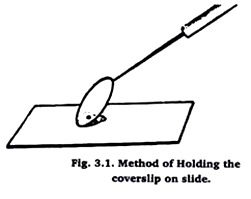
With a glass rod put a small drop of Canada balsam in the centre of slide. Transfer the material from Xylene to this drop with a brush. Take a cover slip and put its one edge on the slide touching the balsam.
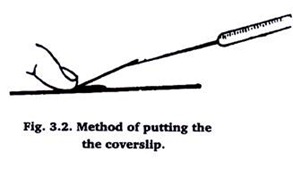
The other edge of cover slip should be held obliquely by a needle as shown in fig. 1. Now bring down slowly, the edge of coverslip which is held with needle as shown in fig. 2. This will prevent the air bubble from entering in between the balsam and cover slip. Clean any oozing balsam with the help of blotting paper.
(1) There should be no, air bubble in balsam.
(2) The material should be in the centre of cover slip.
(3) The coverslip should be in the centre of slide.
(4) Canada balsam should not ooze out of cover slip.
Step # 7. Labelling:
Now put down your name on one edge of the slide and identification of material on the other edge of the slide and put it under microscope for examination.

