In this article we will discuss about the determination of pH solution.
1. pH Paper:
pH papers of both broad and close ranges are available. Those are dispensed in reels. The colour of the paper changes with pH. The colours produced in contact with solutions of different pH are given on the reel for comparison.
The broad range covers 1 to 5, 4 to 6, 6 to 8, 8 to 10, 10 to 12 and 12 to 14.
The narrow range covers fractions of each pH.
ADVERTISEMENTS:
1. Take 10 ml of sample in a clean and dry test tube.
2. Take a piece of broad range pH paper with a pair of forceps and partly deep into the sample. Compare the change of colour with the colour chart and record the range of pH (for example pH 6-7).
3. Then take a piece of narrow range pH paper (e.g., pH 6-7) and partly deep it into the sample. Compare the change of colour with the colour chart in the front page of paper strip.
Record the accurate pH. This is the quickest method used in the field.
2. Lovibond Comparator:
ADVERTISEMENTS:
Principle: The principle of such method lies in developing colour in the sample with an indicator dye and comparing the colour with that of colour comparator (Lovibond comparator) is widely used in the field.
Reagents:
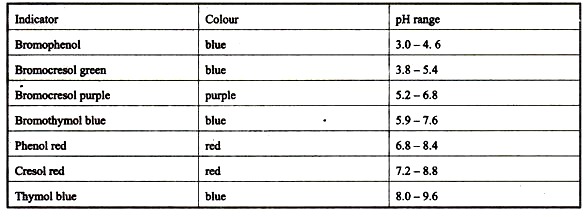
Universal indicators. Any of the following indicators may be used for aqueous medium depending on the expected pH range.
Take the sample in two square tubes up to same level. Adjust the black plate as per direction in manual. Put 2 to 3 drops of indicator in one tube and put it in the right hand side compartment. Place the blank (tube without indicator) in left hand side compartment. Rotate the disc till the colour developed in the right hand side sample coincides with the disc colour. Note the corresponding pH and keep record.
3. pH Meter (Electro- Metric Method):
ADVERTISEMENTS:
The pH meter may be of laboratory type and field type. The field pH meter is battery operated, handy and small.
Laboratory pH meter:
Several makes of pH meters are available an the market. Follow the instruction manual of the meter provided by the manufacturer. The instrument gives an accurate determination of pH in any solution.
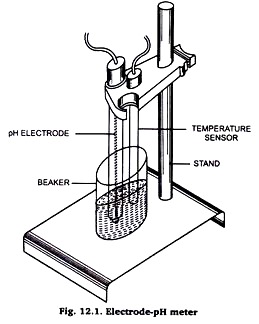
The instrument consists of two electrodes, one glass electrode and other calomel electrode (Fig. 12.1). Glass electrode is not absolute in its measurement and should be repeatedly standardised with solution of known pH.
4. pH Measurement of Water Sample:
Procedure:
1. Connect the instrument to 230 V AC main having good earthing. Switch on supply, Display shows Ready.
2. Connect pH electrode and temperature probe to back panel of the instrument.
ADVERTISEMENTS:
3. Press STD key. If standardization is not in the memory, display will show “PUT 7.0 pH”. Dip the electrode in standard 7.0 pH buffer solution. If standardization is already in the memory, display will show RESTD. The system is as such ready for measurement.
4. Press STD key again. It displays temperature and value of buffer, e.g., 7.00 pH. After a few seconds display will show by “PUT 4.00 pH” and “PUT 9.0 pH” alternately. Dip electrode in either 4.0 pH or 9.2 pH buffer solution.
5. Press STD key again. It displays temperature and value of buffer (5.0 and 9.2 pH).
6. Dip electrode in any unknown solution or water sample.
7. Press pH key. Display will show temperature and pH of solution simultaneously.
8. For next unknown solution simply dip electrode in it. If display shows stand by, press “pH” key.
Maintenance of electrode:
1. Shake the electrode gently to ensure that the internal buffer solution covers the whole membrane and no air bubbles are entrapped.
2. Electrode should be filled with the appropriate electrolyte (saturated KCl solution) up to a height of about 1 cm below the filling hole.
3. Wash off any salt film present on the exterior of electrode, using distilled water.
4. Soak the electrode in distilled water for some hours (preferably overnight), before using first time. Always keep the electrodes dipped in distilled water when not in use.
Field pH meter:
1. Keep M2 switch in M8 position.
2. Set M8 switch in STD—By position. Connect the electrode in the pH socket.
3. Rinse the electrode with distilled water and dry it.
4. Dip the electrode in buffer solution pH 7.0.
5. Set the temperature knob to temperature of solution.
6. Put the M8 switch to pH mode.
7. Adjust the display to buffer value by ASYM knob.
8. Bring M8 switch to STD—By position.
The pH meter is calibrated and ready for measurement:
1. Rinse the electrode with distilled water, dry it and dip in the unknown solution/water.
2. Repeat steps 5 and 6 and the pH value of the unknown solution will be displayed. Note the pH meter reading directly.

