In this article we will discuss about the information about insects by making a collection, mounting and preservation.
What and Where to Collect Insects:
There is no better way to learn about insects than by making a collection. Working with live specimens, killing and mounting them, creates much more interest than studying museum specimens and looking at pictures. Furthermore, mounting and arranging specimens in a collection increases one’s knowledge and understanding of the classification of insects.
Making insect collections takes one outdoors in the fields and forests, and along streams, which is excellent recreation. The student should begin by making a general collection.
ADVERTISEMENTS:
After a knowledge of the most common insects has been acquired he probably will restrict his collecting to insects of certain taxonomic groups. Some very fine collections have been built up by nonprofessional’s, and much information of value has been added to the science.
Hardly a place in a nature exists that does not harbour an insect of some kind. Even though insects may be collected in any season, they are naturally most abundant in warm, moist weather, particularly in the spring and early summer.
Also, collecting may be excellent in the fall when conditions are favourable. As many species are present for only a limited period, collecting should be done throughout the year if the greatest variety of insects is desired.
Every insect has its preferred habitat and hosts, and collections should be made in an many places as possible. Flowers afford the best places for collecting nectar and pollen feeders, such as butterflies, bees, many wasps, and certain flies. Collections should be made on all kinds of plants, for all are host to some type of insect which may be found feeding on the leaves, fruit, steams, trunks, or roots.
ADVERTISEMENTS:
Rotten logs, loose bark, and debris of all types harbour many diverse forms. Many insects are found in aquatic environments. Some live in the water, others on the surface. Certain species are found on aquatic plants or along the shoreline. Animals and their refuse attract many species.
Homes and other buildings, stored products, such as grain and foods, yield many specimens. Large numbers of different insects are attracted to lights under favourable weather conditions, and they may be collected around street lights, screens of lighted homes, or in light traps installed for the purpose.
Better specimens are frequently obtained by collecting the immature stages and rearing the adults. This practice entails more work and time; but one is compensated, not only in better specimens, but also in learning more about the biology of the insects and marks of recognition of the developmental stages.
Collecting Equipment:
ADVERTISEMENTS:
Only a few inexpensive pieces of equipment are needed to make an insect collection. The most important items are an insect net, killing bottle, insect pins, and storage boxes. Other equipment and supplies are desirable, and these will be mentioned later in the discussion. All items may be purchased from entomological supply houses, but most of the equipment may be made.
Net:
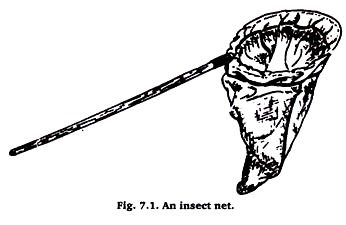
An insect net consists of a handle fitted with a wire hoop to which a cloth bag is attached (Figure 7.1). Two general types of nets are used, the heavier sweeping net and the lighter aerial or butterfly net. The sweeping net needs to be of sturdier construction and the bag of more substantial material (muslin or light canvas).
The aerial net is used in collecting such wary insects as butterflies, dragonflies, and wasps. It should be of light weight and provided with a porous bag of some material such as find netting or marquisette. The length of a bag should be about twice the diameter of the hoop.
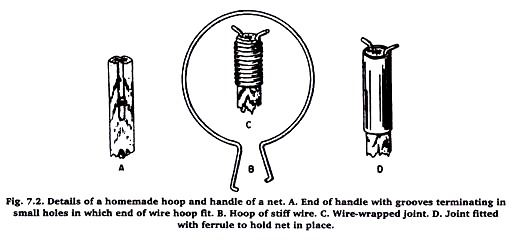
If the net is to be homemade, a handle should be selected that is light in weight, strong, and about 3 or 4 feet in length. On one end of the handle grooves are cut on opposite sides to receive the bent wire of the hoop (Figure 7.2). One groove should be made about 3 ½ inches long and the other 2 ½ inches with a small hole deilled through the handle at the end of each.
If the bags are not going to be changed, the joint may be securely wrapped with small wire. If bags are to be changed occasionally, the handle should be provided with a metal ferrule which can be pushed up to secure the joint.
If one is not at hand, a ferrule may be obtained from a tinsmith. The hoop should be made from a 4-foot length of stiff wire (20 gauge). When the ends are bent for attachment to the handle the diameter of the hoop will be slightly more than 12 inches.
Killing Bottles:
ADVERTISEMENTS:
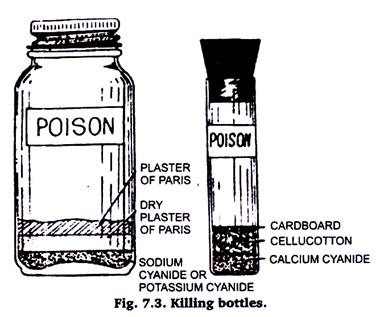
When an insect is collected, it should be killed as quickly as possible in a killing bottle to avoid damaging the specimen. Any wide-mouthed glass jar or vial is satisfactory for making a killing bottle (figure 7.3). It should be provided with a tightly fitting cork or screw cap. A collector needs several bottles of different sizes for different types of insects.
Several chemicals are available for use as killing agents in the bottles; ethyl acetate and cyanide are the most satisfactory. Chloroform and carbon tetrachloride may be used as substitute killing agents when the other compounds are not available. Regardless of the killing agent used, the bottle should be clearly labelled POISON. It is advisable to tape glass bottles to reduce breakage hazards.
Ethyl acetate is readily available and bottles prepared with it are comparatively safe. The compound does not kill so quickly as cyanide, but insects do not recover from its effects as they may do when cyanide is used. Also, specimens can be kept longer in ethyl acetate bottles than in cyanide bottles without becoming brittle and discoloured.
An ethyl acetate killing bottle is easily made. About ½ inch of a mixture of plaster of Paris and water is pored in the bottom of the bottle. The plaster of Paris is allowed to set and dry completely. Drying may be hastened by setting the bottle in an oven.
When the plaster of Paris is thoroughly dry it is saturated with ethyl acetate. The bottle is then ready for use and will remain effective for months if kept tightly closed. When the bottle loses its effectiveness it may be dried and recharged.
Cyanide has been the compound most widely used in making killing bottles. Any one of three forms—calcium cyanide, sodium cyanide, or potassium cyanide—may be used. Calcium cyanide is the most satisfactory. The granular form of calcium cyanide is placed in the bottom of the bottle or vial and covered with a plug of cell cotton which is tamped firmly in place.
A piece of cardboard, perforated with a few pinholes, is cut to fit tightly in the bottle or vial on top of the cell cotton. The bottle is then ready for immediate use. If sodium cyanide or potassium cyanide is used, the bottom of a perfectly dry bottle is covered with the powered or granular cyanide.
On top of the cyanide is added about ½ inch of dry plaster of Paris or plaster of Paris, V4 to V2 inch thick, the plaster of Paris must set and dry before the bottle is closed.
Cyanide is a delay poison and must be handled with extreme care. Bottles containing cyanide must be conspicuously labelled and kept away from those who are not aware of its deadlines. When a bottle is broken or is no longer to be used, it should be carefully disposed of, preferably by burying.
Best results are obtained from a killing bottle through proper use. The bottle should be kept closed and not opened except to put in and take out specimens. Moisture often condenses on the inside of the bottle. This should be wiped out periodically and a few pieces of absorbent paper, such as cleansing tissue, should be kept in the bottle and frequently replaced.
A separate bottle should be kept for moths and butterflies, as scales from their wings stick to other specimens and spoil their appearance. Insects that die slowly, e.g., beetles, also should be kept in a special bottle and never placed with fragile specimens.
Killing bottles should never be overloaded with specimens. Insects in cyanide bottles should be removed as soon as they are dead. If they remain in a cyanide bottle too long they tend to discolor, and when removed they soon become brittle.
Other Collecting Items:
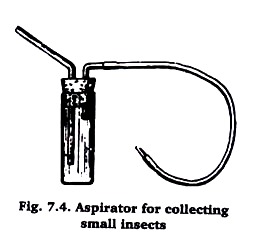
An aspirator is useful in collecting small insects. Probably the simplest form is the vial type (Figure 7.4). Insects are drawn through a tube into the vial by sucking on the mouthpiece. A cloth covers the inner end of the mouthpiece tube to prevent insects from being drawn into the mouth of the collector.
Small insects in trash are most easily collected by use of sifters of various types. The material should be sifted on a cloth background where movements of the tiny insects will reveal their presence. The insects may be picked up with an aspirator or a wet camel’s hair brush.
Large numbers of small insects may be collected by means of a separator which is commonly known as a Berlese funnel. Basically, the separator consists of a sieve, for holding the little or trash, which fits into the top of a funnel.
The insects move downward through the sieve as the litter dries, and drop through the funnel into a killing bottle or a jar containing a preserving fluid. The drying of the litter may be hastened by placing a light bulb or some other source of low heat above the sieve.
Light traps of several types have been made, and used in surveys to determine the distribution and abundance of certain insects. A large number of different insects may be collected in these traps. A convenient way of collecting at a light is to hang a white cloth, such as a sheet, so that the light shines against it. The insects are captured as they collect on the white background or at its base.
Baits of different kinds are useful in collecting insects. “Sugaring” for moths is commonly practiced. A sugary solution is mopped or painted on logs, tree trunks, and stumps to attract the insects. Several mixtures are used for “sugaring” but a fermenting mixture is probably the most satisfactory, the bait is applied before dark and should be visited at intervals during the night.
Other collector’s items include a dip net for aquatic insects, forceps, camel’s hair brushes, a strong knife, hatchet, vials of preserving fluid, boxes for temporary storage of specimens, and some type of knapsack for carrying the equipment.
Mounting and Preserving Insects:
After specimens are collected they must be preserved for future study. Larvae and other soft-bodied forms may be preserved in 80 per cent alcohol or 4 per cent formaldehyde. Most hard-bodied insects are mounted on pins. With proper care they will keep indefinitely. Those too small to pin may be mounted on “minuten” pins, card points, or microscope slides.
Relaxing Jars:
It is advisable to mount insects soon after they are collected, but this is not always possible. When specimens dry they become brittle and may be damaged in pinning. They must be relaxed before they can be pinned. Any wide-mounted jar with a tightly fitting cover can be made into a relaxing jar. The bottom of the jar is covered with wet sand or sawdust.
A few drops of carbolic acid are added to prevent moulds. A piece of cardboard is cut to fit into the jar on top of the sand or sawdust. Insects in open boxes are placed in the jar which is then tightly covered. Usually specimens are sufficiently relaxed to be mounted after 1 or 2 days.
Pinning Insects:
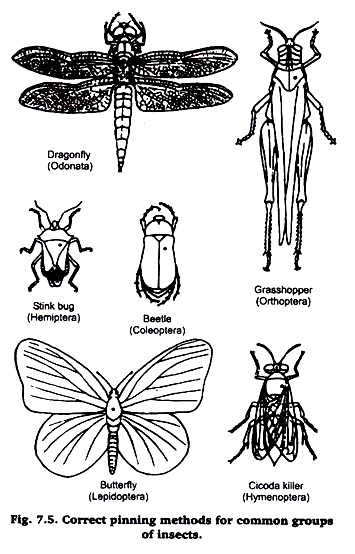
Insect pins may be obtained from any entomological supply house. Common pins cannot be used as they are too short and thick, and soon rust. Insect pins are made in several sizes. For most purposes sizes 2 and 3 are satisfactory. Insects are pinned vertically through the body. The place where the pin is inserted depends upon the type of insect (Figure).
The following rules are followed in pinning the different groups of insects:
1. Orthoptera (grasshoppers, crickets, etc.). Pin through the back of the pro-notum, slightly to the right of the middle line.
2. Hemiptera (stinkbugs, etc.). Pin through the scutellum, slightly to the right of the middle line.
3. Coleoptera (beetles). Pin through the right elytron (wing cover) about midway on the body.
4. Lepidoptera (butterflies and moths). Insert the pin between the base of the front wings.
5. Diptera (flies) and Hymenoptera (bees, wasps, etc.). Pin through the thorax, slightly to the right of the midline.
6. Odonata (dragonflies and damselflies). Pin through the middle of the thorax. To conserve space in the collection they may be pinned horizontally through the thorax.
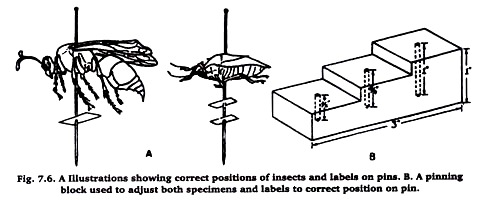
A collection should appear neat, with the specimens uniformly mounted about an inch above the point of the pin. Labels on the pin should be uniformly arranged also (Figure 7.6 A). This is most easily obtained by using a pinning block, a block of wood with three steps (Figure 7.6 B). In each step a small hole is drilled. Beginning with the first (lowest) step, the holes are ⅜ ⅝ and 1 inch deep, respectively.
Spreading Boards:
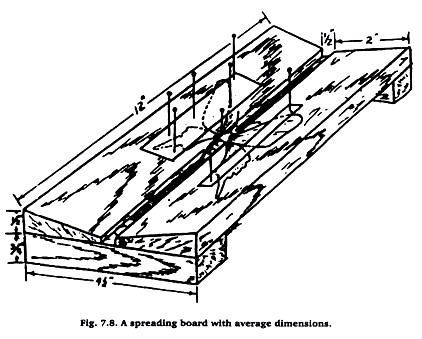
Some insects, such as moths and butterflies, are usually mounted with their wings spread. Spreading boards are used for this purpose and are important collector’s items. Different sizes and types may be purchased or made at home. Figure 7.6 shows the general type of construction and average dimensions. Soft wood top pieces should be used to facilitate the insertion of pins.
Certain rules are followed in spreading the wings of insects. The front wings of moths and butterflies should be spread with the rear margin at a right angle with the body, he front margin of the hind wings should be under the rear margin of the front wings. Strips of paper are pinned across the wings to hold them in position until the specimens are dried.
In spreading the wings of dragonflies, damselflies, grasshoppers, and most other insects, the front margin of the hind wings should be at a right angle with the body and the front wings pulled forward sufficiently so the wings do not touch.
Labelling Specimens:
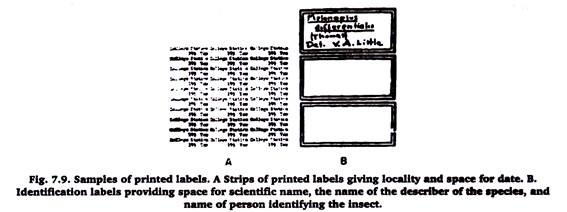
Unless a specimen in a collection is accompanied by a label bearing certain essential information, it is of little scientific value. A label should always give the date and locality of the insect’s capture. Additional information giving the name or initials of the collector and the hosts or habitat of the insect is desirable.
One or two labels maybe used (Figure 7.7). If only one label is used it should bear the locality, date and name or initials of the collector. When two labels are used, the first should give information on locality and date, and the second the name of the collector and hosts or habitat.
Labels should be of uniform size, about ¾ inch long and ½ inch wide and made from stiff paper. Lettering may be done by hand, printed, or obtained partly printed from entomological sup labels is to type a number on plain white paper.
This paper is photographed and prints made. The labels may be cut from the prints as they are used. Identification labels are usually plain white or bordered, about ½ by ¼ inches in size, and pinned against the bottom of the box.
Insect Boxes:
Boxes for housing pinned specimens should have the bottom lined with a soft material such as cork or balsa wood, and they need to be as pest proof as possible. The best known type is the Schmitt box which is readily obtained from supply houses.
Cigar boxes are most frequently used by the beginner. Also, heavy cardboard boxes are satisfactory for temporary use. The collection needs to be checked frequently for museum pests. Large collections in institutions are frequently housed in cabinets which contain glass-top drawers. The drawers are fitted with trays of different sizes which facilitate rearrangement without having to shift individual specimens.
Riker Mounts:
Riker mounts are convenient for display and teaching purpose. A riker mount is a shallow cardboard box about 1 inch deep, filled with cotton and with a glass top. The insects are placed on the cotton background and are held in position by the glass cover. Various sizes of Riker mounts may be purchased or made. The size most commonly used is 8 inches wide and 12 inches long.
Riker mounts are easily made. All the items needed are a supply of cardboard boxes (such as hose boxes), window-pane glass, glass cutter, cotton, and tape. The top of the lid of the box is cut out, leaving a margin about ¼ inch wide. A piece of glass is cut to fit in the top and secured with tape along its edges.
Covering the sides of the Riker mount increases its durability and improves the appearance. Black tape makes a better appearing mount. The mount may be filled with cotton of any type which is covered with a layer of medicated cotton to improve the appearance and provide a smooth surface. The cover is secured by pins pushed into the mount through the sides and ends.
Protecting Collections from Pests:
Insect collections are attached by demisted larvae, ants, and other pests. If precautions are not taken, the collections may soon reduce to fragments and powder. Naphthalene (flakes or balls) is most commonly used in the protection of collections.
This compound is a satisfactory repellent, but it will not the pests one the collection has become infested. If an infestation has developed it is necessary to use a fumigant, such as paradichlorobenzene (PDB), carbon tetrachloride, carbon disulphide, or ethylene dichloride.
